オープンライセンスのソフトウェア
ImageMagickをつかう時
ある程度使うコマンドは限られています。
よく使うコマンド
- identify
- convert
- mogrify
たった3つ?って思うかもしれませんが
実際、他のコマンドはほとんど使わない。
もちろん全く使わないことではないけど、
上の3つと比べるとかなり頻度は減ると思います。
アルバム作りたい!って人は
montageってコマンドは覚えたら良いと思う。
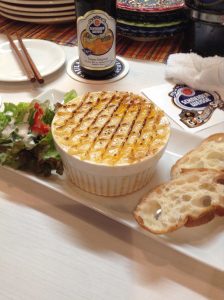
今回使う画像はこれです。

御徒町にあるビアバー「ヒチカケ」さんの
べらぼうに美味しいシェパーズ・パイです。
まずはこの画像の情報を見てみましょう。
identify
identifyはその画像の情報を調べるのに
とても便利なコマンドです。
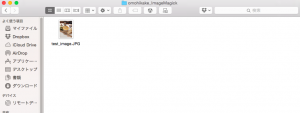
とりあえず「omohikake_ImageMagick」というディレクトリに
test_image.JPGを入れておきます。
|
1 |
$ identify test_image.JPG |
と入力してみます。
そうすると、
|
1 |
$ test_image.JPG JPEG 1936x2592 1936x2592+0+0 8-bit sRGB 1.92MB 0.010u 0:00.000 |
とまあ簡単な情報が出てきます。
ぶっちゃけこれだけだと全くと言っていいほど役に立ちません。
そこで必要なのが"-verbose"というコマンドです。
正確にはオプションなんですけど、もうセットだと思っていいんじゃないかと。
|
1 |
$ identify -verbose test_image.JPG |
これを叩いてみると…
けっこう細かい情報が出てきます。
|
1 2 3 4 5 6 7 8 9 10 11 12 13 14 15 16 17 18 19 20 21 22 23 24 25 26 27 28 29 30 31 32 33 34 35 36 37 38 39 40 41 42 43 44 45 46 47 48 49 50 51 52 53 54 55 56 57 58 59 60 61 62 63 64 65 66 67 68 69 70 71 72 73 74 75 76 77 78 79 80 81 82 83 84 85 86 87 88 89 90 91 92 93 94 95 96 97 98 99 100 101 102 103 104 105 106 107 108 109 110 111 112 113 114 115 116 117 118 119 120 121 122 123 124 125 126 127 128 129 130 131 132 133 134 135 136 137 138 |
Image: test_image.JPG Format: JPEG (Joint Photographic Experts Group JFIF format) Mime type: image/jpeg Class: DirectClass Geometry: 1936x2592+0+0 Resolution: 72x72 Print size: 26.8889x36 Units: PixelsPerInch Type: TrueColor Endianess: Undefined Colorspace: sRGB Depth: 8-bit Channel depth: red: 8-bit green: 8-bit blue: 8-bit Channel statistics: Pixels: 5018112 Red: min: 4 (0.0156863) max: 255 (1) mean: 164.917 (0.646733) standard deviation: 62.6415 (0.245653) kurtosis: -0.0832993 skewness: -0.882872 entropy: 0.95157 Green: min: 2 (0.00784314) max: 255 (1) mean: 141.337 (0.554262) standard deviation: 65.7838 (0.257976) kurtosis: -0.865307 skewness: -0.345141 entropy: 0.972236 Blue: min: 0 (0) max: 255 (1) mean: 119.281 (0.467767) standard deviation: 68.4763 (0.268535) kurtosis: -1.19257 skewness: 0.160501 entropy: 0.971645 Image statistics: Overall: min: 0 (0) max: 255 (1) mean: 141.845 (0.556254) standard deviation: 65.6772 (0.257558) kurtosis: -0.714861 skewness: -0.371037 entropy: 0.96515 Rendering intent: Perceptual Gamma: 0.454545 Chromaticity: red primary: (0.64,0.33) green primary: (0.3,0.6) blue primary: (0.15,0.06) white point: (0.3127,0.329) Background color: white Border color: srgb(223,223,223) Matte color: grey74 Transparent color: black Interlace: None Intensity: Undefined Compose: Over Page geometry: 1936x2592+0+0 Dispose: Undefined Iterations: 0 Compression: JPEG Quality: 96 Orientation: TopLeft Properties: date:create: 2016-06-05T19:52:56+09:00 date:modify: 2016-06-05T19:52:56+09:00 exif:ApertureValue: 4845/1918 exif:BrightnessValue: 4987/1832 exif:ColorSpace: 1 exif:ComponentsConfiguration: 1, 2, 3, 0 exif:DateTime: 2016:05:20 20:50:37 exif:DateTimeDigitized: 2016:05:20 20:50:37 exif:DateTimeOriginal: 2016:05:20 20:50:37 exif:ExifImageLength: 2592 exif:ExifImageWidth: 1936 exif:ExifOffset: 174 exif:ExifVersion: 48, 50, 50, 49 exif:ExposureBiasValue: 0/1 exif:ExposureMode: 0 exif:ExposureProgram: 2 exif:ExposureTime: 1/24 exif:Flash: 32 exif:FlashPixVersion: 48, 49, 48, 48 exif:FNumber: 12/5 exif:FocalLength: 33/10 exif:FocalLengthIn35mmFilm: 33 exif:ISOSpeedRatings: 100 exif:Make: Apple exif:MakerNote: 65, 112, 112, 108, 101, 32, 105, 79, 83, 0, 0, 1, 77, 77, 0, 7, 0, 1, 0, 9, 0, 0, 0, 1, 0, 0, 0, 2, 0, 3, 0, 7, 0, 0, 0, 104, 0, 0, 0, 104, 0, 4, 0, 9, 0, 0, 0, 1, 0, 0, 0, 1, 0, 5, 0, 9, 0, 0, 0, 1, 0, 0, 0, 210, 0, 6, 0, 9, 0, 0, 0, 1, 0, 0, 0, 217, 0, 7, 0, 9, 0, 0, 0, 1, 0, 0, 0, 1, 0, 8, 0, 10, 0, 0, 0, 3, 0, 0, 0, 208, 0, 0, 0, 0, 98, 112, 108, 105, 115, 116, 48, 48, 212, 1, 2, 3, 4, 5, 6, 7, 8, 85, 102, 108, 97, 103, 115, 85, 118, 97, 108, 117, 101, 85, 101, 112, 111, 99, 104, 89, 116, 105, 109, 101, 115, 99, 97, 108, 101, 16, 1, 19, 0, 0, 9, 209, 62, 92, 32, 131, 16, 0, 18, 59, 154, 202, 0, 8, 17, 23, 29, 35, 45, 47, 56, 58, 0, 0, 0, 0, 0, 0, 1, 1, 0, 0, 0, 0, 0, 0, 0, 9, 0, 0, 0, 0, 0, 0, 0, 0, 0, 0, 0, 0, 0, 0, 0, 63, 255, 255, 251, 222, 0, 0, 172, 247, 255, 255, 254, 173, 0, 0, 1, 217, 255, 255, 229, 185, 0, 0, 39, 78 exif:MeteringMode: 5 exif:Model: iPad mini exif:Orientation: 1 exif:ResolutionUnit: 2 exif:SceneCaptureType: 0 exif:SceneType: 1 exif:SensingMethod: 2 exif:ShutterSpeedValue: 3237/706 exif:Software: 8.3 exif:SubjectArea: 1295, 967, 699, 696 exif:SubSecTimeDigitized: 924 exif:SubSecTimeOriginal: 924 exif:WhiteBalance: 0 exif:XResolution: 72/1 exif:YResolution: 72/1 jpeg:colorspace: 2 jpeg:sampling-factor: 1x2,1x1,1x1 signature: 85d4b5b8ba702c8fe498dc55aaab65096ff8015fdf8e88fb078b1268461127ae unknown: 33/10, 33/10, 12/5, 12/5 Profiles: Profile-8bim: 104 bytes Profile-exif: 978 bytes Profile-icc: 3144 bytes Profile-iptc: 63 bytes City[1,90]: 0x00000000: 254700 -% unknown[2,0]: unknown[2,63]: 205037 unknown[2,62]: 20160520 Created Date[2,55]: 20160520 Created Time[2,60]: 205037 Profile-xmp: 2548 bytes Artifacts: filename: test_image.JPG verbose: true Tainted: False Filesize: 1.92MB Number pixels: 5.018M Pixels per second: 27.88MB User time: 0.160u Elapsed time: 0:01.180 Version: ImageMagick 6.9.3-6 Q16 x86_64 2016-02-28 http://www.imagemagick.or |
"exif:〜"
の部分がExif情報です。
後で消すから、覚えといてくださいね。
いつ撮られた写真か、誰が撮ったか、どこで撮ったか、何で撮ったかなど
設定していればほぼ全部表示されます。
ちなみに、このExif情報を辿ったら
シェパーズ・パイを食べることが出来ますよ(笑)
convert
次のコマンドはconvertです。
画像を変換して新しい画像を作り出すコマンドだ!
ぐらいに最初は考えとけばいいかな?
JPG拡張子をPNG拡張子にしたい時とか(あんまないけど)は
convertコマンドだけで一発です。
|
1 |
$ convert test_image.JPG test_image.png |
lsで確認
|
1 2 |
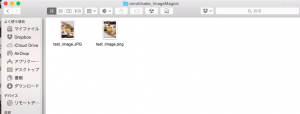
$ ls test_image.JPG test_image.png |
ほらPNG画像が出来上がってますね。
でもこれってImageMagickじゃなくても簡単にできます。
オプションを追加してリサイズするとかならちょっとは
使われるかも。
とりあえずJPG画像を50%のサイズにしてPNGにしましょう。
|
1 |
$ convert test_image.JPG -resize 50% test_image.png |
ディレクトリ内をちらっと見てみると
画像が2つありますね。
一応だけど、identifyで確認してみましょう。
|
1 2 3 |
$ identify test_image.JPG test_image.png test_image.JPG JPEG 1936x2592 1936x2592+0+0 8-bit sRGB 1.92MB 0.000u 0:00.000 test_image.png PNG 968x1296 968x1296+0+0 8-bit sRGB 1.806MB 0.000u 0:00.009 |
ちゃんとリサイズされてますね。
自分としては一番奥深いコマンドだと思ってます。
公式ドキュメントを読んでいると
拡張性が半端無いと感じました。
ImageMagickを使ってExif情報をいじくるときも
このconvertコマンドは大活躍します。
それはまた今度、書きます。
mogrify
このコマンドも奥深いコマンドです。
だけど最初は変換した画像を上書きする。
ぐらいで良い気がする。気になりゃドキュメント読めばいいし。
例えば・・・
画像に埋め込まれている"Exif情報"を消したい。
位置情報とか埋め込まれているからちょっと怖かったりするもんね。
そんな時に、コマンド一発できれいにしてくれます、
|
1 |
$ mogrify -strip test_image.JPG |
これだけです。
-stripというオプションは画像に埋め込まれたExif情報を
きれいすっきり無くしてくれます。
さて、identify -verbose で確認してみましょう。
exif:〜"が消えてるかチェックしますよ。
|
1 2 3 4 5 6 7 8 9 10 11 12 13 14 15 16 17 18 19 20 21 22 23 24 25 26 27 28 29 30 31 32 33 34 35 36 37 38 39 40 41 42 43 44 45 46 47 48 49 50 51 52 53 54 55 56 57 58 59 60 61 62 63 64 65 66 67 68 69 70 71 72 73 74 75 76 77 78 79 80 81 82 83 84 85 86 87 88 |
$ identify -verbose test_image.JPG Image: test_image.JPG Format: JPEG (Joint Photographic Experts Group JFIF format) Mime type: image/jpeg Class: DirectClass Geometry: 1936x2592+0+0 Resolution: 72x72 Print size: 26.8889x36 Units: PixelsPerInch Type: TrueColor Endianess: Undefined Colorspace: sRGB Depth: 8-bit Channel depth: red: 8-bit green: 8-bit blue: 8-bit Channel statistics: Pixels: 5018112 Red: min: 4 (0.0156863) max: 255 (1) mean: 164.912 (0.646715) standard deviation: 62.63 (0.245608) kurtosis: -0.082768 skewness: -0.883546 entropy: 0.951701 Green: min: 2 (0.00784314) max: 255 (1) mean: 141.339 (0.55427) standard deviation: 65.7831 (0.257973) kurtosis: -0.865409 skewness: -0.34527 entropy: 0.972239 Blue: min: 0 (0) max: 255 (1) mean: 119.278 (0.467758) standard deviation: 68.4715 (0.268516) kurtosis: -1.19264 skewness: 0.160391 entropy: 0.971655 Image statistics: Overall: min: 0 (0) max: 255 (1) mean: 141.843 (0.556247) standard deviation: 65.6716 (0.257536) kurtosis: -0.714973 skewness: -0.371347 entropy: 0.965198 Rendering intent: Perceptual Gamma: 0.454545 Chromaticity: red primary: (0.64,0.33) green primary: (0.3,0.6) blue primary: (0.15,0.06) white point: (0.3127,0.329) Background color: white Border color: srgb(223,223,223) Matte color: grey74 Transparent color: black Interlace: None Intensity: Undefined Compose: Over Page geometry: 1936x2592+0+0 Dispose: Undefined Iterations: 0 Compression: JPEG Quality: 96 Orientation: Undefined Properties: date:create: 2016-06-05T20:48:19+09:00 date:modify: 2016-06-05T20:48:19+09:00 jpeg:colorspace: 2 jpeg:sampling-factor: 1x2,1x1,1x1 signature: a939fe66f0d9407dcde5dfb587c1683d7088a32a77eaef3895dea5d9869cbc56 Artifacts: filename: test_image.JPG verbose: true Tainted: False Filesize: 1.88MB Number pixels: 5.018M Pixels per second: 33.45MB User time: 0.150u Elapsed time: 0:01.150 Version: ImageMagick 6.9.3-6 Q16 x86_64 2016-02-28 http://www.imagemagick.org |
ほら消えてますね。
よかったよかった。
本当はね、方向を定義しているOrientationの情報も
消えちゃっているのは良くないと思うんですよね。
だからExiftool使って埋め込んどくのが良いです。
一応これでオッケー↓
|
1 2 |
$ exiftool -orientation=1 test_image.JPG 1 image files updated |
(*Exiftoolをインストールしてないと動きません。)
仕様上どうしてもImageMagickじゃなきゃ嫌だ!!
って言う方には別の方法があるので、それはまたの機会に。
- identify
- convert
- mogrify
とりあえずこの3つを覚えておけば
ImageMagickの最初としてオッケーじゃないかな。
じゃあね~


